If you’ve ever had too many raspberries on hand and didn’t want them to go bad, turning them into syrup is a smart way to make the most of them. Canning that syrup takes it even further.
You get to store all that bright, tart-sweet flavor in a jar and enjoy it for months. Whether you’re into topping your pancakes or want something quick to stir into drinks, this canned raspberry syrup covers both.
And the best part is it’s easy to make at home with just a few pantry staples.

How to Make Raspberry Syrup for Canning?
Ingredients
- Fresh Raspberry (Frozen or Thawed)
Take 4 cups of fresh Raspberries. Wash it properly.
- Granulated Sugar
2 ½ Cups of granulated sugar for that thick, sweet base of the syrup.
- Water
¾ Cup of water will be needed for dissolving the sugar.
- Lemon Juice
Finally, 2 tablespoons of lemon juice. Use a bottled one, recommended for consistent acidity.
Instructions
Step 1: Prepare Your Canning Setup
First, start with sterilizing jars. Wash them through a hot dishwasher cycle or boil them for 10 minutes in a pot of boiling water. Keep them hot until you are ready to fill them. Also, set up your water bath canner and bring the water to a gentle simmer.
Step 2: Cook The Raspberries
Now, the cooking part, add your raspberries and water to a heavy pan or stockpot. Now, medium heat, and simmer it for about 10–12 minutes. In the meantime, while it’s cooking, use a spoon or potato masher to mash the berries and release their juice gently.
Step 3: Strain the Juice
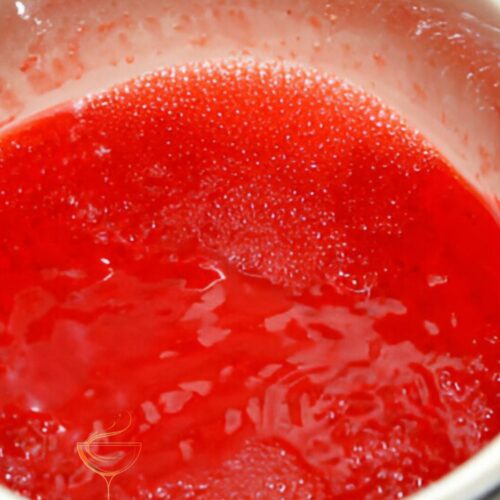
Now, we need to strain the juice. So, place a fine mesh strainer or cheesecloth over a bowl and carefully pour in the mixture. Then, press down or squeeze gently to extract as much juice as you can. This strained liquid will become your syrup.
Step 4: Make the Syrup
After that, return the raspberry juice to the pot and stir in the sugar and lemon juice. Warm the mixture over medium heat until the sugar fully dissolves. Then, bring it to a light boil for 1–2 minutes. Then, remove from the heat.
Step 5: Fill the Jars
Now, come to the jar. First, ladle the hot syrup into the prepared jars, leaving ¼ inch of headspace at the top. Then wipe the rims clean, apply the lids, and twist the bands on until fingertip tight.
Step 6: Process in Water Bath
Using a jar lifter, carefully place the jars into the water bath canner. Make sure they are fully submerged. Process for 10 minutes or longer if you’re above 1,000 feet elevation.
Once done, turn off the heat and let the jars sit in the hot water for 5 more minutes. Then remove.
Step 7: Cool and Check the Seals
Finally, set the jars on a towel-lined counter. Then let them cool undisturbed for 12 to 24 hours. After that, check that each lid has sealed properly. The center should not pop up and down when pressed.
Note: Remember, you have to store the sealed jars in a dark and cool place.
Best Ways to Use Canned Raspberry Syrup
Once you’ve got a few jars ready to go, here’s how you can use that fruity syrup:
- Breakfast: This syrup can make your morning amazing. Just drizzle over pancakes, waffles, or French toast.
- Drinks: This syrup is best for any kind of sweet drink, especially in iced tea, lemonade, or cocktails for a berry twist.
- Dessert sauce: Pour over cheesecake, brownies, or scoops of ice cream and make your dessert more interesting.
- Yogurt or Oatmeal: Adds natural sweetness and color to your morning bowl.
- For gift-giving: Add a label and ribbon, and gift to neighbors or friends!
Tips for Safe Syrup Canning
- Always use bottled lemon juice; it guarantees the consistent acidity needed for safe canning.
- Do not compromise with hygiene. Always sterilize the jars, lids, and tools before use.
- Follow Headspace guidelines. Leave about ¼ inch to prevent leaking or spoilage.
- Note the date of canning so you can track freshness.
Canned Raspberry Syrup Recipe
Ingredients
- 4 Cups Fresh Raspberries
- 2 ½ Granulated Sugar
- 3/4 Cup Water
- 2 Tbsp Bottled Lemon Juice
Instructions
- Sterilize jars using boiling water or dishwasher; keep them hot until filled.
- Simmer raspberries and water in a pan for 10–12 minutes, mashing them gently.
- Strain the mixture through cheesecloth or a fine mesh strainer to extract juice.
- Combine juice, sugar, and lemon juice in a pan. Heat gently until sugar dissolves, then boil for 1–2 minutes.
- Ladle hot syrup into jars, leaving ¼-inch headspace. Wipe rims, apply lids, and tighten bands.
- Process in a water bath canner for 10 minutes (longer if over 1,000 ft elevation).
- Cool on towel-lined counter for 12–24 hours. Check seals before storing.
Nutrition
Conclusion
From raspberry syrup making to canning, the whole kitchen project is fun. And it is always satisfying. Now you can make your own syrup, especially when it’s bursting with real raspberry flavor and sealed up in jars. You can enjoy all year round. No preservatives or artificial colors included. It’s simple and healthy.